Introduction
Generally weather stations are very expensive. You need also a computer or a raspberry to upload data on an APRS server. The weather station described here is very simple. Just an esp8266 and a BME280 (Cost 7$). For the moment the station measure temperature, humidity, pressure. In some weeks, I add wind speed and direction. Measurements are uploaded to an APRS server automatically. Weather datas are also logged into esp8266. So you can draw curves with LibreOffice Calc. Time is synchronized with NTP (Network Time Protocol). You don’t need to compil source code. I add configuration menu into ESP8266.
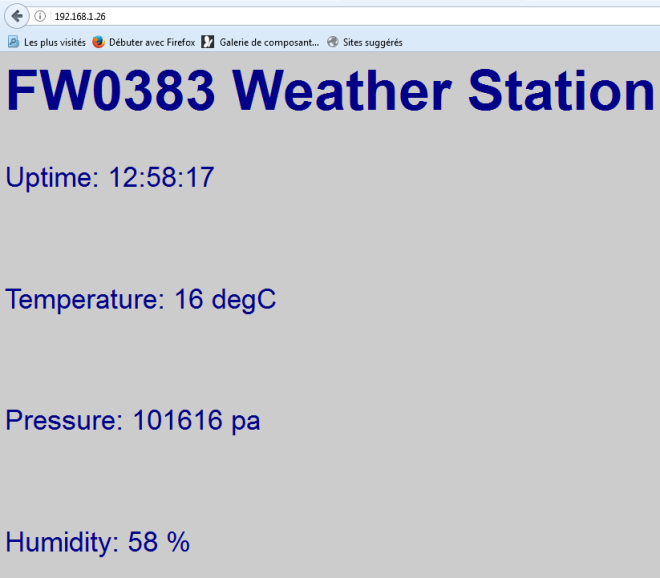
Esp8266 include a little web page to see Weather datas.
Weather station characteristics:
- Simple design.
- Upload datas on APRS server
- NTP sync
- Data logger
- BME280
- ESP8266 (all versions)
- Can be installed outdoors (power supply and case not described yet)
- Configuration menu
- Web page included
- Wind Speed and direction (in few weeks esp12 only)
- Cost 7€ max
- No HAM licence required
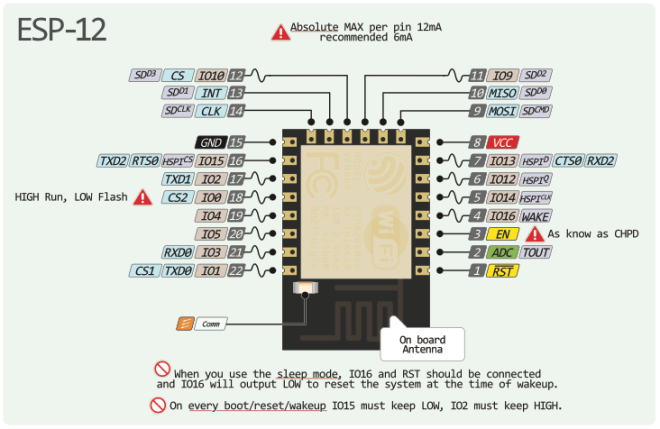
Two schematics one with ESP01, the other with ESP12E
ESP01
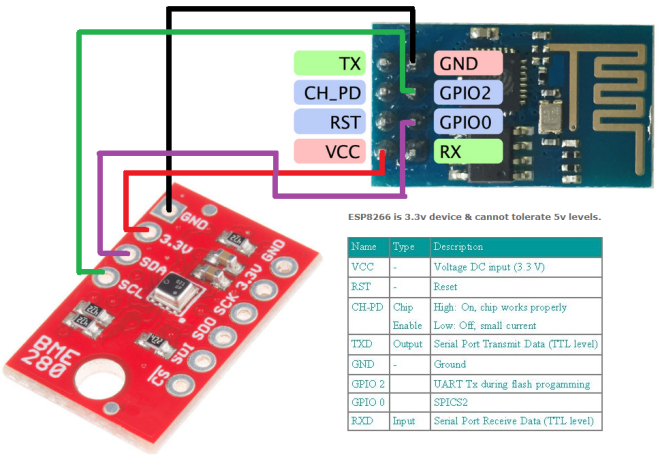
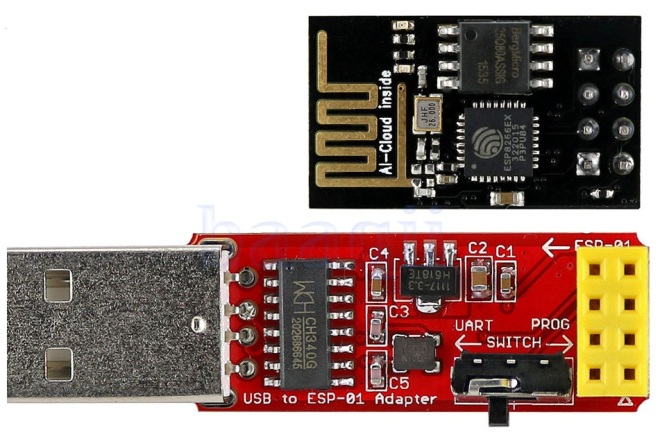
Schematic is easy, just 4 wires between esp8266 and BME280. Is more easy to use an adapter to program ESP. Beware to switch inverted on Prog or Uart to run program.
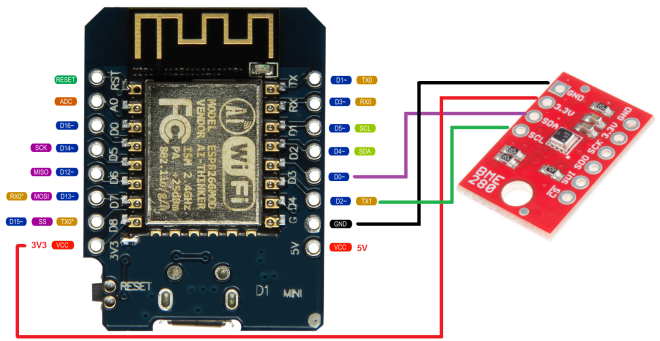
ESP12E
Idem for schematic, just 4 wires between esp8266 and BME280.You don’t need any adapter to program ESP. There is micro USB plug. I prefer to use this model.I will add improvements for standalone mode outside house (power supply with solar cells)
BME280


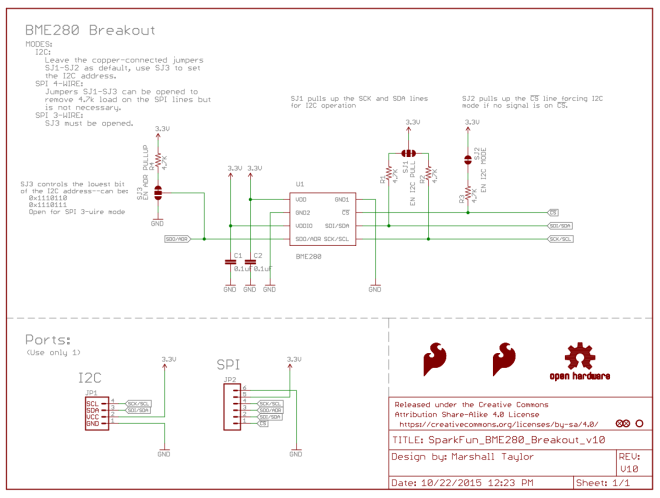
Features: (source https://www.sparkfun.com/products/13676)
- Operation Voltage: 3.3V
- I2C & SPI Communications Interface
- Temp Range: -40C to 85C
- Humidity Range: 0 – 100% RH, =-3% from 20-80%
- Pressure Range: 30,000Pa to 110,000Pa, relative accuracy of 12Pa, absolute accuracy of 100Pa
- Altitude Range: 0 to 30,000 ft (9.2 km), relative accuracy of 3.3 ft (1 m) at sea level, 6.6 (2 m) at 30,000 ft.
Software
ESP can be programmed with BME280 plugged.
https://github.com/f4goh/Weather
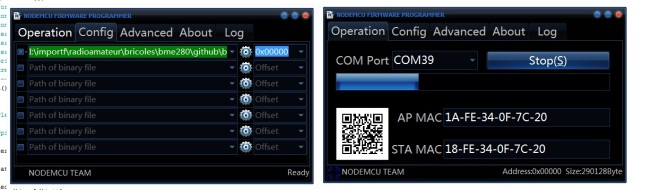
Two ways for programming esp8266
- Use nodemcu 0.9 programmer (bme_V06_esp01.bin or bme_V06_esp12E.bin)
- switch inverter to prog with esp01 inserted,
- plug usb adapter
- launch nodemcu 0.9 programmer
- load your firmware
- flash esp8266
- when finished unplug adapter
- switch inverter to uart
- plug usb adapter
- launch serial terminal (115200 bps)
- type m key to get the config menu (m key with Line Feed)
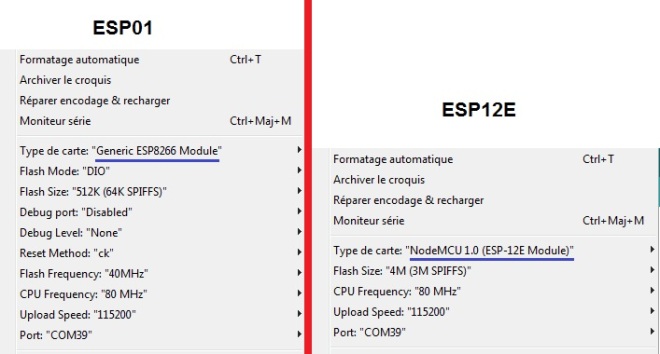
- recompile all with Arduino IDE
- install esp8266 in Arduino environment https://github.com/esp8266/Arduino
- install both library NTPtimeESP-master https://github.com/SensorsIot/NTPtimeESP
- And SparkFun_BME280_Arduino_Library-master https://github.com/sparkfun/SparkFun_BME280_Arduino_Library
- Change I2C line into SparkFunBME280.cpp
//Wire.begin();
with
Wire.begin(0,2); //sda 0 , scl 2
- Load bme_V06.ino
- According to esp, configure your model
- Program ESP
- launch serial terminal (115200 bps)
- type m key to get the config menu (m key with Line Feed)
If this is the 1st time esp is programed, config menu starting, type ‘m’ if it doesn’t appears
CWOP callsign
Before configure, you need a callsign for your weather station
![]()
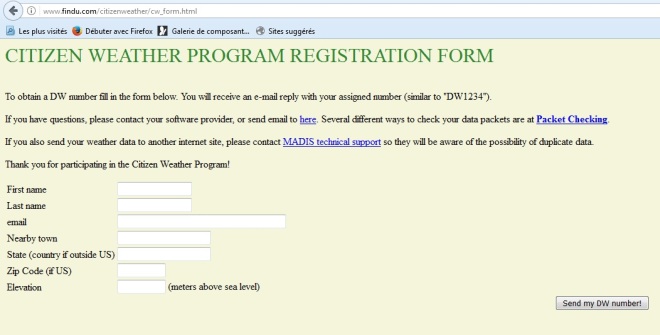
Complete this form, you will receive a callsign by email.
http://www.findu.com/citizenweather/cw_form.html
Configuration
———–
Config menu
0 Quit menu
1 format file system
2 config wifi access point
3 config weather station
4 test ntp
5 test bme 280
6 test server upload
7 print weather data logger (historic)
8 create and erase weather data logger
———–
1 st format file system then go to config wifi access point
———–
Config wifi access point menu
0 Save and exit access point menu
1 ssid list
2 set ssid
3 set ssid password
4 show ssid config
5 test ssid
———–
Print ssid list then retype your AP in “set ssid” option and your password in “set ssid password”
scan start
scan done
5 networks found
1: Livebox-67E0 (-88)*
2: orange (-87)
3: orange (-92)
4: orange (-83)
5: Livebox-0x00 (-61)*
your wifi ssid config is
Livebox-0x00
xxxxxxxxxxxxx(password)
Check ssid connexion and exit menu
Connected to Livebox-0x00
IP address: 192.168.1.32
Go to Config weather station
———–
Config weather station
0 Save and exit weather station menu
1 set callsign station
2 set longitude
3 set latitude
4 set server address
5 set server port
6 set transmit delay
7 logger enable
8 show weather config
———–
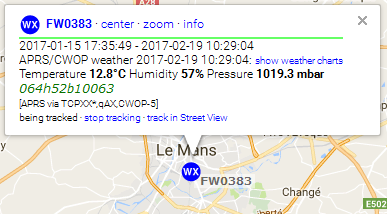
Configure all items like this (do not use this GPS coordinates it is mine 🙂
callsign : FW0383
longitude : 00012.21E
latitude : 4759.75N
server address : cwop.aprs.net
server port : 14580
tx delay : 15 (in minutes)
logger enable : 1 (save weather datas into esp at each server upload)
Save config and Perform this tests
4 test ntp
5 test bme 280
6 test server upload
8 create and erase weather data logger
0 Quit menu
Sample tests print screen
Connected to Livebox-0x00
IP address: 192.168.1.32
Waiting for NTP packet
82.197.164.46
sending NTP packet…
NTP packet received, length=48
2017-2-18-7 17H 43M 37S
->>>>> next tx at : 17:58:00
Program Started
Starting BME280… result of .begin(): 0x60
Displaying ID, reset and ctrl regs
ID(0xD0): 0x60
Reset register(0xE0): 0x0
ctrl_meas(0xF4): 0x27
ctrl_hum(0xF2): 0x1
Displaying all regs
0x80:8F 50 89 34 2E 14 F6 06 6F 6F 39 67 32 00 F0 8C
0x90:B2 D5 D0 0B 0F 1A E6 FF F9 FF AC 26 0A D8 BD 10
0xA0:00 4B 20 00 00 00 00 00 00 00 00 00 33 00 00 C0
0xB0:00 54 00 00 00 00 60 02 00 01 FF FF 1F 4E 08 00
0xC0:00 40 27 FF 00 00 00 00 01 00 00 00 00 00 00 00
0xD0:60 00 00 00 00 00 00 00 00 00 00 00 00 00 00 00
0xE0:00 6C 01 00 13 0A 00 1E 07 41 FF FF FF FF FF FF
0xF0:FF 00 01 0C 27 00 00 55 6D 00 7E 95 00 73 5E 80
Displaying concatenated calibration words
dig_T1, uint16: 28527
dig_T2, int16: 26425
dig_T3, int16: 50
dig_P1, uint16: 36080
dig_P2, int16: -10830
dig_P3, int16: 3024
dig_P4, int16: 6671
dig_P5, int16: -26
dig_P6, int16: -7
dig_P7, int16: 9900
dig_P8, int16: -10230
dig_P9, int16: 4285
dig_H1, uint8: 75
dig_H2, int16: 364
dig_H3, uint8: 0
dig_H4, int16: 314
dig_H5, int16: 0
dig_H6, uint8: 30
Temperature: 19.59 degrees C
Temperature: 67.03 degrees F
Pressure: 101544.86 Pa
%RH: 51.78 %
Connected to Livebox-0x00
IP address: 192.168.1.32
Waiting for NTP packet
195.186.4.101
sending NTP packet…
NTP packet received, length=48
2017-2-18-7 17H 44M 16S
->>>>> next tx at : 17:59:00
FW0383>APRS,TCPXX*:@174416z4759.75N/00012.21E_…/…g…t067r…p…P…h52b10156
# javAPRSSrvr 3.15b08
# logresp FW0383 unverified, server CWOP-4
closing connection
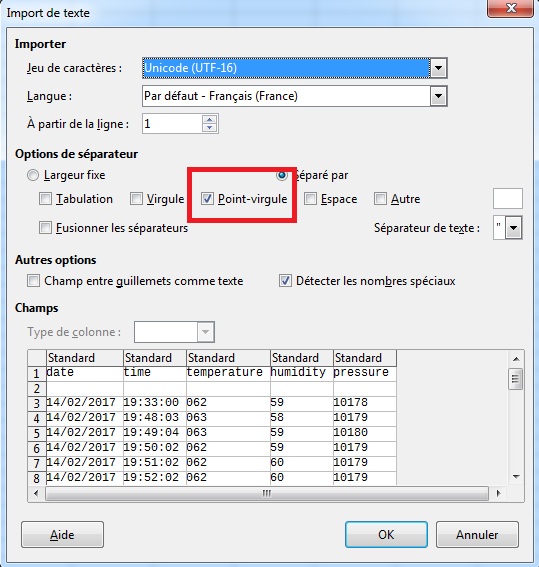
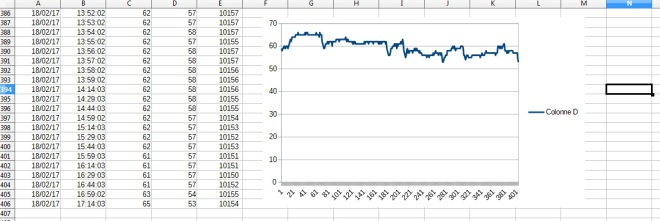
To draw your curves just paste datas show on terminal into LibreOffice calc.
====== read logger file =========
date;time;temperature;humidity;pressure
14/02/2017;19:33:00;062;59;10178
14/02/2017;19:48:03;063;58;10179
14/02/2017;19:49:04;063;59;10180
14/02/2017;19:50:02;062;59;10179
14/02/2017;19:51:02;062;60;10179
14/02/2017;19:52:02;062;60;10179
14/02/2017;19:53:02;062;59;10179
14/02/2017;19:54:02;062;59;10179
14/02/2017;19:55:03;062;60;10180
14/02/2017;19:56:02;062;60;10179
14/02/2017;19:57:02;062;60;10180
14/02/2017;19:58:03;062;59;10180
14/02/2017;19:59:02;062;60;10180
Conclusion:
Making this little weather station was a good learning path on software aspects.
I discover SPIFFS, NTP and CWOP
I add wind speed and direction soon, but only with esp12
73 Anthony F4GOH

my APRS weather station is now online https://aprs.fi/weather/a/DL1GMG-6
but i had to recompile the code to set the passcode which is necessary for ham callsign and every second reading of ntp time was 255, as workaround i read the ntp time twice
i also want to extend to windspeed and winddirection measurement
You promised to add it
Is there already a new version available ?
If not i try to do it by myself
Thanks for your work, nice project on cheap hardware
J’aimeJ’aime
hello,
the weather callsign like FWxxx is used for CWOP server. registering is free. So you don’t need passcode.
I write this article for no Ham users.
If you want to use your call you need to modify source code.
Yes i promised to add wind, but not before september. I work on a long range HF tracker for a man who across atlantic sea with paddles.
And the project need to be finished in 2 months.
73
Anthony
J’aimeJ’aime
I work on wind speed and direction
I think on a new board with HF(rtty,psk31,wspr,jt65) ,VHF(APRS) ,WIFI,LORA modules
controlled by html
project finish about in 3 months 🙂
73
Anthony
J’aimeJ’aime
Hi Anthony,
I have added a do – while statement to the void ntp() function.
Now the ntp time works good.
void ntp()
{
if (WiFi.status() == WL_CONNECTED)
{
// first parameter: Time zone in floating point (for India); second parameter: 1 for European summer time; 2 for US daylight saving time (not implemented yet)
do
{
dateTime = NTPch.getNTPtime(1.0, 1);
NTPch.printDateTime(dateTime);
}
while(!dateTime.valid);
nextMinTx = (dateTime.minute + station.transmitDelay) % 60;
Serial.print(« ->>>>> next tx at : « );
char buffer[20];
sprintf(buffer, « %02d:%02d:%02d », dateTime.hour, nextMinTx, 0);
Serial.println(buffer);
}
}
Greetings and thanks for the program
Philip PA3DFN
J’aimeAimé par 1 personne
[…] ESP8266 Weather Station […]
J’aimeJ’aime
Hi,
Really great work!
Some info for others:
I’ve built two versions for myself using NodeMCU v.3 (this one include RS232USB CH340G converter compatible with Windows 10) and BME280. Both parts cost me 7$ total on Aliexpress.
I need to install Arduino IDE with required libraries because little modification in code is needed. Some of BME280 sensors (especially Chinese one) use different I2C address – 0x76. Also, if you have radio amateur license and your own call sign, you can modify one line of code and provide your APRS-IS passcode.
Please also be extremely careful when enter geographical coordinates – if your station is not visible on map using this sample link http://www.findu.com/cgi-bin/find.cgi?call=EWxxxx (at the end replace by your call sign), coordinates needs to be corrected. Longitude is 5 digit . 2 digit, latitude is 4 digit . 2 digit!
Also, you can correct NTP address to point it on nearest server (local for your country).
I’m not a programmer, so Anthony, questions to you:
– how to enable more precise temperature on web page? I mean with decimal part.
– in code I found some part regarding to graphs, it works (I can read this file by paste correct link to web page address), but I don’t understand what it shows to me…
– if you have enabled log, maybe you can use these data to plot graph on web page? Just as idea for future improvement…
Regards
Tadeusz SQ2CET
J’aimeJ’aime
Hello,
-how to enable more precise temperature on web page? I mean with decimal part.
yes, change html web page (sprintf) and add decimal part.
-in code I found some part regarding to graphs, it works (I can read this file by paste correct link to web page address), but I don’t understand what it shows to me…
just for testing perhaps later
-if you have enabled log, maybe you can use these data to plot graph on web page? Just as idea for future improvement…
log record csv file compatible with office calc
73
Anthony
J’aimeJ’aime
Hi Anthony,
I have changed your code a little to get it running from an 18650 3.7V 2600mAh LiPo for a long time. I put the 8862 in deepsleep mode to preserve the LiPo. The disadvantage of this is that the upload time varies a little. Sometimes there is no upload to aprs.fi at all. I will look to add a check for this.
To make the deep sleep work you need to add a wire between D0 and RST on the 8862.
You can find my code at Github https://github.com/pschroth/aprs-weather
73’s Philip
J’aimeAimé par 1 personne
Hello Philip,
Thanks for improving software. It is a good idea.
Now, I always work on esp8266 to make a sheild for Espduino.
HF,VHF,UHF beacon (controlled by HTML). I also add MP3 player on DRA818 (fit on esp8266) to send vocals messages.
PCB is finished. now software begin.
73
Anthony
J’aimeJ’aime
Hi Anthony,
thanks for your info. Yes esp8266 are incredible. I will follow your beacon project. Looks very interesting. A friend of me is constructing a DMR/D-Star/C4FM hotspot on the esp8266. So it looks like the hams are embracing this little gadget.
gr, 73’s Philip
J’aimeJ’aime
Hello Anthony!
It seems very interesting!
I will begin the project I know nothing about programing my level is just the use of Xloader LOL but its a good reason to start!
73 qro
Patrick
J’aimeJ’aime
Hello Patrick,
thank you for the interest in ESP8266 weather station
this project is the cheaper i have done.
73
Anthony
J’aimeJ’aime
I am impressed with your project and would be pursuing this soon. I have just ordered a BME280 sensor and as soon as I get it , shall be trying it on.
Just wanted to know how difficult would it be to incorporate a GPS addition and reading location via it ?
vu2upx
J’aimeJ’aime
Hello,
Thanks for comment,
Most of the time, this station are in the same place near adsl box, so the GPS coordinates are typed
to add a GPS, you must find a second uart input on ESP8266. gpio13 RXD2 mcu1.0 for exemple
Kolbans-Book
then use a gps library like tinyGPS.
but tinyGPS return decimal position. you need to re-encode it in minutes decimal for APRS.
perhaps is more simple tu use your own software GPS.
73
Anthony
J’aimeJ’aime
Hi Anthony,
I’m observing packet loss on my SQ2CET-13 station. In my opinion something has changed in APRS network, especially for licensed call signs (CWOP FWxxxx etc. are not affected). Doesn’t matter which aprs.net I’ve set. This is not only my observation, my colleague SP2GDK has the same issue. Even when I manually trigger send test package, it’s accepted but not appeared https://aprs.fi/?c=raw&call=SQ2CET-13
Can it be related to issue described https://groups.google.com/forum/#!topic/aprsfi/uzjdm026NZQ and https://github.com/hessu/perl-aprs-fap/issues/3 ?
Regards
Tadeusz SQ2CET
J’aimeJ’aime
hello
my project use only (CWOP FWxxxx etc…
73
Anthony
J’aimeJ’aime
Hello Anthony,
Iam not familiar in terminals, Can I use PuTTY to configure the system? Not sure it can up to 115200 bds or any advise?
73
Patrick
J’aimeJ’aime
you should use Hterm like me.73.Anthony
J’aimeJ’aime
Thank you so much for this piece of code, your project is easy and funny, and become my « hello world » in ESP8266 programming.
Just my 2 cent for improve compatibility and compliance with aprs standard, inside « connexion » function the time format of the sentence (the aprs packet) isn’t correct, look:
sprintf(sentence, « %s>APRS,TCPXX*:@%02d%02d%02dz%s/%s_…/…g…t%03dr…p…P…h%02db%05d », station.callsign, dateTime.hour, dateTime.minute, dateTime.second………………..
the timestamp need to be indicated by ‘h’ and not by ‘z’, because as you can read in APRS101 standard, ‘z’ stand for DHm, Day of current month, Hour, minute. and you sprintf() into sentence the HMs format instead, that must be indicated with ‘h’, this is the correct form:
sprintf(sentence, « %s>APRS,TCPIP*:@%02d%02d%02dh%s/%s_…/…g…t%03dr…p…P…h%02db%05dNodeMCU+BME280 », station.callsign, dateTime.hour, dateTime.minute, dateTime.second………………………
in this way aprs.fi doesn’t told me anymore ‘delayed and out of order packet’.
i’ve also changed TCPXX in TCPIP (isnt’ mandatory but more appropriate to my eyes) and added a short comment at the end of the packet, so when you click on the wx icon on aprs.fi map they appear inside the ‘info baloon’…nice 🙂
As hamradio operator i’m using rotate.aprs.net servers and not the cwop ones, you can simply change the login string in this way to access:
sprintf(login, « user %s pass yournumericalpasshere vers VERSION ESP8266 », station.callsign);
and use the appropriate server
strcpy(station.clientAdress, « rotate.aprs.net »);
Important:
if you don’t register yourself at the cwop program you can access the cwop server anyway, but you may experienced a loss of packets because the server return « unverified » callsign. Please register to cwop or use your callsign and you passw if you are an OM.
Thank you again,
IU5HKU Marco
J’aimeAimé par 1 personne
great project just got it working and also added a powerbank to which I attached a solar panel. I noticed that my esp12 does not save the settings and each time it goes out of power the settings are lost (weather station config) and need to connect again to set it up. did I do something wrong while uploading it or is my hardware malfunctioning?
J’aimeJ’aime
did you format file system ? menu 1
J’aimeJ’aime
thank you for your prompt response .
yes ,and I retried doing that again now after your message but it doesn`t seem to have any effect
I connected now and formatted file system and then checked connection settings and weather station settings and were still there and then menu 8 create erase date retuns
file open failed
====== new logger file ========
I am using an esp-12 with ftdi serial to program it .in android ide I have set board:nodemcu for esp-12 module and programmer AVR ISP .does this make any difference?
thank you!
J’aimeJ’aime
There is something wrong in filesystem. could you write binary file with nodemcu ?
J’aimeJ’aime
Antony thank you for your support . your comment lead me to the solution. in short it now works. long description for future reference: I flashed the esp with the nodemcu programmer as per your comment and it was saving the configs but the readings from the bm280 sensor were wrong, so I had to find a way to edit the i2c address and reflash the esp12. so in Arduino IDE I noticed that in tools > Flash size : I had selected no SPIFFS ! so by changing that to 4M (3M SPIFFS) and reflashing it now works perfectly! maybe you can add a comments in the Arduino IDE upload instructions that Flash size should be set to 3M SPiFFS . thank you again .
J’aimeJ’aime
very very good !!!! — 73 iw1cgw Giovanni
J’aimeJ’aime
[…] Avevo per le mani un ESP-001 e un BME280 e non sapendo come passare il tempo libero in casa che il CoronaVirus ci ha offerto ho adattato una pensata mica male di IU5HKU che ha pubbicato un interessante lavoro su GitHub e che invito a visionare : https://github.com/IU5HKU/MiniWXStation – così come invito a visionare l’interessante progetto di F4GOH sempre riguardo ESP-001 e stazione meteo : https://hamprojects.wordpress.com/2017/02/19/esp8266-weather-station/ […]
J’aimeJ’aime
Tkanks for info i test it soon and update my website.
J’aimeJ’aime
Hi, All works fine,, only one issue : Change I2C line into SparkFunBME280.cpp
//Wire.begin();
with
Wire.begin(0,2); //sda 0 , scl 2
This is not to be found in : SparkFunBME280.cpp
The result is of course no interaction from my BME280
I tried to put a : Wire.begin(0,2); //sda 0 , scl 2 in the setup of
the main INO before compiling, but no other results.
Any help is welcome 🙂
73 ON2ON
J’aimeJ’aime
Everything works fine now, except the Connection to Cwop : i received a FW xxxx number , but always get a connection failed : 2020-6-1-2 8H 43M 52S
->>>>> next tx at : 08:03:00
FW7646
>APRS,TCPXX*:@084352z51.342N
/4.52504E
_…/…g…t068r…p…P…h50b10206
connection failed
J’aimeJ’aime